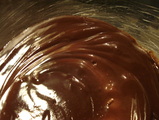
1) Seized Ganache: Ganache is supposed to be a silky mixture of cream and chocolate. The main thing to keep in mind is that it absolutely HATES moisture (aka water) of any kind. I've tried numerous ways to make it, and have found that (as long as you don't burn either the cream or chocolate) most mishaps can be SAVED. I make my ganache by scalding the cream and then adding it to unheated chopped chocolate, covering the bowl while it melts. Then, 3-5 minutes later, I can usually just whisk it until it's smooth and shiny (like the picture above). But sometimes, especially here in the humid South or if I am distracted or rushing, it can suddenly turn into a grainy lump or separate into what looks like oil and clumps of grainy chocolate (both scenarios are known as "seized" ganache)...and it's not a pretty sight. When that happens, take a deep breath and dump the entire gloppy mixture into a food processor (a blender does not seem to work, sorry) and process for several minutes until the mixture turns back into silky ganache (it will sound different--"flop-flop"--when it pulls itself together). To ganache purists and gurus out there, it may not look quite as beautiful as the original--but it is completely usable again. Crisis averted!
2) Broken Buttercream: Buttercream is a mixture of butter, confectioner's or caster sugar, cream, and flavorings. It is also somewhat temperamental: both temperature and humidity affect it, and it does NOT like to be rushed. I always use a paddle (not whisk) attachment on my mixer and cream the butter for several minutes before adding the sugar, then continue beating until it is fluffy and nearly done before adding flavorings. It really needs to be used within about an hour (unrefrigerated) or it may begin to separate and need to be mixed up again. Occasionally, buttercream can turn on you and look like a curdled mess (in chef'y terms, my friend Robin informed me that it has "broken"). Again, pull out your food processor, and process in portions until it reintergrates (BE PATIENT). Then put it all back into a (chilled) mixing bowl to finish it into delicious fluffiness! TA DA!
3) Chewy Meringues, Macaroons or Macarones: While we are on the subject of the effect weather has on baking, let me say that I have learned that there are good meringue days (cool/dry) and bad meringue days (hot/humid)--and I don't try to defy Mother Nature with these dainty crispy delights. I also make sure I am not in a rush when I make them (you'll see why in a minute). I use a chilled stainless bowl (never plastic) and whisk attachment that have been carefully washed to remove any butter or oil residue, and room temperature eggwhites that have been scrupulously separated (i.e. a bit of white in with yolks is OK, but yolk in with the whites is NOT). I find it works best to beat the whites at high speed until soft peaks form, then add cream of tartar and sugar, and continue beating until stiff peaks form. After folding in other ingredients, I spoon or pipe them onto parchment-lined baking sheets and leave them alone (no opening the door to peak) in a low oven (100-125 degrees F), as called for in whatever recipe I use. If you have a convection oven, the fan can actually help dry out the meringue (in this case, that's a good thing)...though be aware that some "hybrid" ovens won't allow you to use the convection feature below 300 degrees. My secret (learned from my mom) to crispy meringues is to leave them in the oven (once you've turned it off, of course) for several hours or overnight so they really dry out and get crispy...these are among the few desserts that are meant to be dry (not soft or chewy).
Hope these tips help boost your confidence as a baker and kitchen scientist!


 RSS Feed